It sure was fun helping (mostly watching) the new building go up.
Here are some pictures and comments on the process. For some other
pics, go to the C-Lab site, which is where we were at the time.
We hope this information helps anyone else contemplating a
similar project. And, hey, Doug gets to play proud papa.
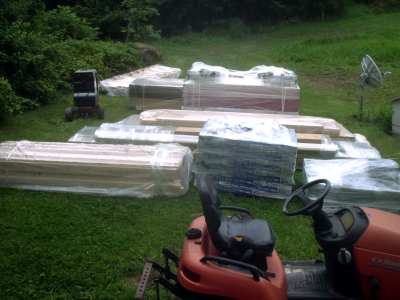 You have to start somewhere. Here's the stack of stuff they delivered
from Home Depot to make a building out of. Doesn't look like enough
until you realize that for example, those wrapped up blocks
are essentially solid wood. It's all there except the couple of
pallets of cinder blocks I bought to become the pilings, the nails
and the paint.
You have to start somewhere. Here's the stack of stuff they delivered
from Home Depot to make a building out of. Doesn't look like enough
until you realize that for example, those wrapped up blocks
are essentially solid wood. It's all there except the couple of
pallets of cinder blocks I bought to become the pilings, the nails
and the paint.
|
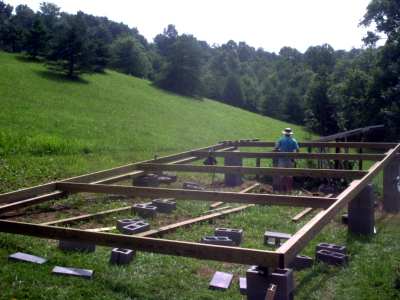 Here is one of the builders
showing me how to set up the foundation, which is the customer's
responsibility. He helped me anyway, so thank you! I went back and
added quite a few pilings, and an extra row under the lathe side
of the building since I knew that's where the big weight would be.
So, as a bonus, we get something of a basement or crawl space with
this. The building is sited so as to face due south, since the
solar panels will go up on the roof. Sadly, this is eating some
of my very fertile garden plot, but this is also the best building
site on this side of the creek. The other side is hard to get to,
and we wanted to keep the buildings all on the same side for now
to allow them to support one another with water, electricity and
other things. Here is one of the builders
showing me how to set up the foundation, which is the customer's
responsibility. He helped me anyway, so thank you! I went back and
added quite a few pilings, and an extra row under the lathe side
of the building since I knew that's where the big weight would be.
So, as a bonus, we get something of a basement or crawl space with
this. The building is sited so as to face due south, since the
solar panels will go up on the roof. Sadly, this is eating some
of my very fertile garden plot, but this is also the best building
site on this side of the creek. The other side is hard to get to,
and we wanted to keep the buildings all on the same side for now
to allow them to support one another with water, electricity and
other things.
|
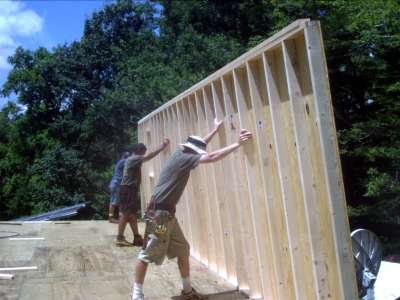 As I said, these
guys are fast. This is happening around noon on the first
day a full crew came. It sounded like a battlefield with
all those nail guns going full blast. As I said, these
guys are fast. This is happening around noon on the first
day a full crew came. It sounded like a battlefield with
all those nail guns going full blast.
|
 Here we are at
quitting time of the first day of full crew. For the first couple
of days, only the supervisors came out, to consult on details and
sort of help me get the foundation together. They weren't supposed
to do that, but are nice guys. Thanks! But once the real
workers came, things happened very quickly. Not bad for a day's
work, eh? Here we are at
quitting time of the first day of full crew. For the first couple
of days, only the supervisors came out, to consult on details and
sort of help me get the foundation together. They weren't supposed
to do that, but are nice guys. Thanks! But once the real
workers came, things happened very quickly. Not bad for a day's
work, eh?
|
 Here we are at day two
sometime. They've already put in the second floor joists and the
roof rafters, which they built on–site. What a team! The main
workers were a guy from Poland, and a guy from Georgia, not the one
in the USA. Their supervisors called them Mexicans to rag on them.
We think we were very lucky to have these guys on the job. They knew
their stuff and really worked hard and smart. Ok, the Polish
guy did shoot himself in the arm with his nailgun...but kept on
working anyway. No, we didn't make any Polish jokes. This cat
deserved all the respect we could give him. Here we are at day two
sometime. They've already put in the second floor joists and the
roof rafters, which they built on–site. What a team! The main
workers were a guy from Poland, and a guy from Georgia, not the one
in the USA. Their supervisors called them Mexicans to rag on them.
We think we were very lucky to have these guys on the job. They knew
their stuff and really worked hard and smart. Ok, the Polish
guy did shoot himself in the arm with his nailgun...but kept on
working anyway. No, we didn't make any Polish jokes. This cat
deserved all the respect we could give him.
|
 It started raining,
so the guys got real motivated to get some roofing on. It didn't
help much, as it just funneled the water to the cracks between
the boards. But they did move right along on this part. Supervisors
don't like getting wet. It didn't bother the other guys. It started raining,
so the guys got real motivated to get some roofing on. It didn't
help much, as it just funneled the water to the cracks between
the boards. But they did move right along on this part. Supervisors
don't like getting wet. It didn't bother the other guys.
|
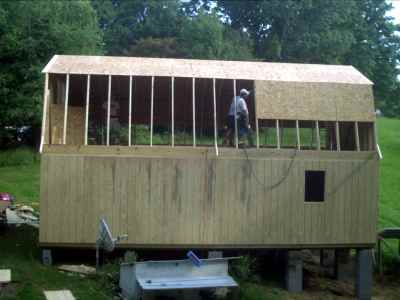
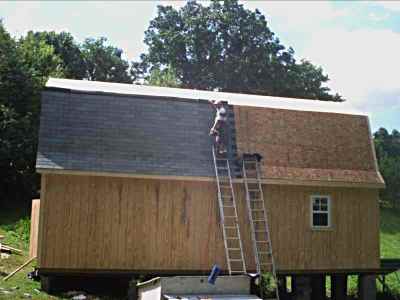 Looks like these
guys are going home early on day 3. It only took this fellow a
few hours to put all the shingles on with one helper, the Gypsy,
feeding him shingles and nails. They are all straight, and they
don't leak. What more can one ask? They left us a few packages
of leftovers so we can make repairs later if needed. We did
ding a couple getting the solar panels up there. Looks like these
guys are going home early on day 3. It only took this fellow a
few hours to put all the shingles on with one helper, the Gypsy,
feeding him shingles and nails. They are all straight, and they
don't leak. What more can one ask? They left us a few packages
of leftovers so we can make repairs later if needed. We did
ding a couple getting the solar panels up there.
|
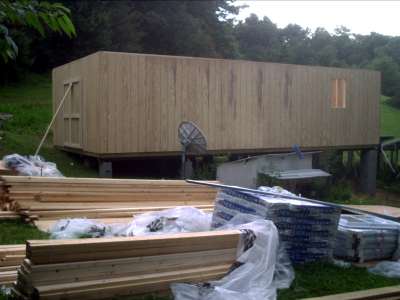
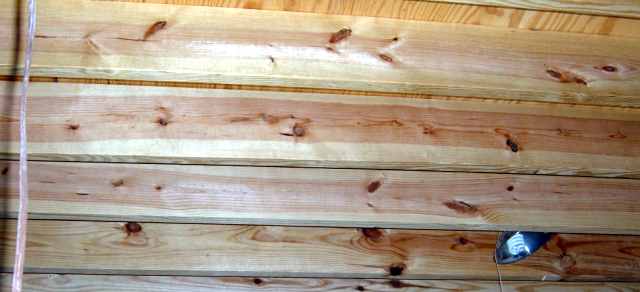 For example, the roof rafters, boards,
and shingles all went on in less than one day. Doug helped by
adding extra cinder–block pilings under the first floor
where we knew the heavy stuff was going to go. They did a very nice
job on the basic shell. Strangely, the major structural pieces were
mostly imported wood, from Sweden of all places. It sure was hard
to drill holes in for the wiring – this is some of the tougher
wood we've seen. We burned out one Milwaukee angle drill on this
stuff, and almost burned out a second one before going to an auger
bit with a hand–ground hex end and an air ratchet wrench.
Note to Milwaukee: One reason the Japanese are eating your
lunch is that they are smart enough to not use a threaded–in chuck
on a reversable drill, and they DO usually have thermal protection.
After all that hard work to put in the wiring, I wimped out on the
compressed air plumbing, which just runs along the joist bottoms.
You can see why we dropped initial plans to paint this white for better
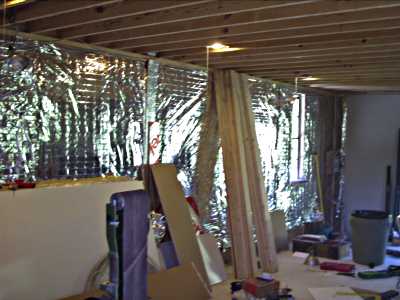
lighting. It's just too pretty to hide. All the first floor wiring
is run around the periphery at ceiling level. Every so often there
is a 4 outlet box between the rafters. From these are dropped normal
hardware store power strips to have outlets in handy places. One
feature of this method is that there are no breaches of the vapor
barrier. This place is TIGHT. The walls are insulated
with the normal fiberglass, then there is a layer of "space"
blanket, aluminized mylar, over that, glued at the seams. Then the
interior wall. This approach wouldn't work for in–between
the joists, so there we used a couple of layers of R-Max and caulk.
There are a couple of holes in the floor to let
electricity and compressed air in. There are no holes in the walls.
In winter, we blow warm dry air down into the "basement"
to dry out the dirt floor, in summer we will turn the fan around
the other way. Here is what the walls looked like before the
drywall was put in. Note that the studs are really 8 foot, so combined
with the floor and ceiling sills, we have a little over 8 foot ceiling
on the ground floor. This is nice when you have long things to
carry around.
For example, the roof rafters, boards,
and shingles all went on in less than one day. Doug helped by
adding extra cinder–block pilings under the first floor
where we knew the heavy stuff was going to go. They did a very nice
job on the basic shell. Strangely, the major structural pieces were
mostly imported wood, from Sweden of all places. It sure was hard
to drill holes in for the wiring – this is some of the tougher
wood we've seen. We burned out one Milwaukee angle drill on this
stuff, and almost burned out a second one before going to an auger
bit with a hand–ground hex end and an air ratchet wrench.
Note to Milwaukee: One reason the Japanese are eating your
lunch is that they are smart enough to not use a threaded–in chuck
on a reversable drill, and they DO usually have thermal protection.
After all that hard work to put in the wiring, I wimped out on the
compressed air plumbing, which just runs along the joist bottoms.
You can see why we dropped initial plans to paint this white for better
lighting. It's just too pretty to hide. All the first floor wiring
is run around the periphery at ceiling level. Every so often there
is a 4 outlet box between the rafters. From these are dropped normal
hardware store power strips to have outlets in handy places. One
feature of this method is that there are no breaches of the vapor
barrier. This place is TIGHT. The walls are insulated
with the normal fiberglass, then there is a layer of "space"
blanket, aluminized mylar, over that, glued at the seams. Then the
interior wall. This approach wouldn't work for in–between
the joists, so there we used a couple of layers of R-Max and caulk.
There are a couple of holes in the floor to let
electricity and compressed air in. There are no holes in the walls.
In winter, we blow warm dry air down into the "basement"
to dry out the dirt floor, in summer we will turn the fan around
the other way. Here is what the walls looked like before the
drywall was put in. Note that the studs are really 8 foot, so combined
with the floor and ceiling sills, we have a little over 8 foot ceiling
on the ground floor. This is nice when you have long things to
carry around.
|
 We then put on a layer of drywall, which turned out to be fairly
expensive in labor costs. We might not do it that way again, and
did do the second floor differently. On top of the drywall, we
put whiteboard. Finally, enough scribble space! The real reason
for that is to have walls that are easy to clean in a place where
everything from oil to chips and sawdust goes flying. The whiteboard
is pretty inexpensive, and the main problem was getting it screwed in
well so it didn't buckle. We tried contact cement first, but
that was more or less a complete failure. Luckily, we marked where
the wall studs
were on the sill plate and floor before doing the drywall. We used
Armstrong tile for the flooring. Wow, that adhesive will really
act on your nervous system – even with open windows. This worked
out well, but we should have put down a good layer of wax or
something before doing anything else, as it is possible to stain
this stuff.
We then put on a layer of drywall, which turned out to be fairly
expensive in labor costs. We might not do it that way again, and
did do the second floor differently. On top of the drywall, we
put whiteboard. Finally, enough scribble space! The real reason
for that is to have walls that are easy to clean in a place where
everything from oil to chips and sawdust goes flying. The whiteboard
is pretty inexpensive, and the main problem was getting it screwed in
well so it didn't buckle. We tried contact cement first, but
that was more or less a complete failure. Luckily, we marked where
the wall studs
were on the sill plate and floor before doing the drywall. We used
Armstrong tile for the flooring. Wow, that adhesive will really
act on your nervous system – even with open windows. This worked
out well, but we should have put down a good layer of wax or
something before doing anything else, as it is possible to stain
this stuff.
|
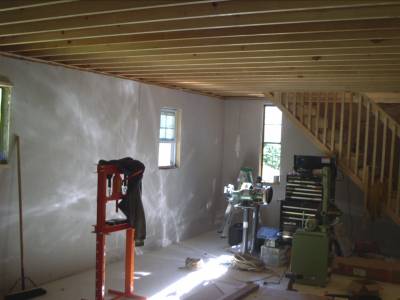 Here's a wall after drywalling it, but before putting up the whiteboard.
Note some tools have already crept in, as that is the fun part. The cool
looking reflection is from a piece of left over space blanket. You
can see what the whiteboard looks like in various other pictures
of the shop. We added some windows we found at the dumpster, the
universal recyling location around these parts. If it's good, you
leave it outside the dumpsters for someone else...
Here's a wall after drywalling it, but before putting up the whiteboard.
Note some tools have already crept in, as that is the fun part. The cool
looking reflection is from a piece of left over space blanket. You
can see what the whiteboard looks like in various other pictures
of the shop. We added some windows we found at the dumpster, the
universal recyling location around these parts. If it's good, you
leave it outside the dumpsters for someone else...
|
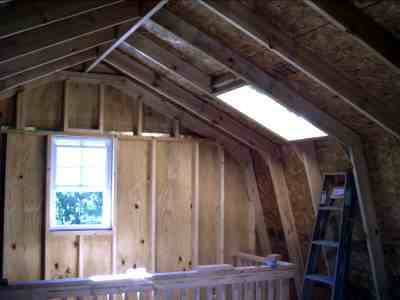 Here is the unfinished upstairs after Doug added a skylight. I always
wanted one of these, and this gives roof access without going up
a long ladder outside. Turned out to be very nice when it came
time to scrape snow off the solar panels in winter. Doug then built
a drop down ladder to this out of some very nice 100+ year old
oak flooring that Paul planed and dadoed for him. It doesn't leak,
by the way. I did have to add latches to it so the wind won't
blow it open, though.
Here is the unfinished upstairs after Doug added a skylight. I always
wanted one of these, and this gives roof access without going up
a long ladder outside. Turned out to be very nice when it came
time to scrape snow off the solar panels in winter. Doug then built
a drop down ladder to this out of some very nice 100+ year old
oak flooring that Paul planed and dadoed for him. It doesn't leak,
by the way. I did have to add latches to it so the wind won't
blow it open, though.
|
 Here is is mostly finished upstairs. After the somewhat negative
experience with drywalling (the labor cost was just too high) I
decided to use particle board upstairs, with just whiteboard
for the ceiling. I don't like the effect of painting it white,
so didn't finish doing the whole room. In this picture you can
see the plating bench with insulated tanks built in, and some
of the upstairs compressed air plumbing. How did I ever get
along without that? The fat black wires at the top are from
the solar panels. We have since added a "Frankenstein looking
"
knife switch so we can "float" these during thunderstorms,
even though we also have lightning rods that go 20 feet above the
roof peak at each end. That's just too much money to put at risk,
and if there's no good current path to ground, lightning ought to take
another way – we hope! We don't know, as lightning hasn't hit
the place yet, but it will, it has hit the lower place behind
us several times. In the meanwhile, one of the lightning rods can
also be floated off ground, and makes a dandy vertical antenna.
Upstairs we had 6" studs, so we used thicker insulation. We put
in a passive turbine vent and made some other slight mods, like
blocking air intake from the north side, and adding a fan to the
turbine for those really hot days. There's a trapdoor to where
the turbine opens in, so we can use it to exhaust the room, or just
behind the insulation only. Nice on those super hot days. But
even on the hottest days, this place never gets as hot as a mobile
home that's partly in the shade. Nice!
Here is is mostly finished upstairs. After the somewhat negative
experience with drywalling (the labor cost was just too high) I
decided to use particle board upstairs, with just whiteboard
for the ceiling. I don't like the effect of painting it white,
so didn't finish doing the whole room. In this picture you can
see the plating bench with insulated tanks built in, and some
of the upstairs compressed air plumbing. How did I ever get
along without that? The fat black wires at the top are from
the solar panels. We have since added a "Frankenstein looking
"
knife switch so we can "float" these during thunderstorms,
even though we also have lightning rods that go 20 feet above the
roof peak at each end. That's just too much money to put at risk,
and if there's no good current path to ground, lightning ought to take
another way – we hope! We don't know, as lightning hasn't hit
the place yet, but it will, it has hit the lower place behind
us several times. In the meanwhile, one of the lightning rods can
also be floated off ground, and makes a dandy vertical antenna.
Upstairs we had 6" studs, so we used thicker insulation. We put
in a passive turbine vent and made some other slight mods, like
blocking air intake from the north side, and adding a fan to the
turbine for those really hot days. There's a trapdoor to where
the turbine opens in, so we can use it to exhaust the room, or just
behind the insulation only. Nice on those super hot days. But
even on the hottest days, this place never gets as hot as a mobile
home that's partly in the shade. Nice!
|
So, that's the story of getting this place built. Thanks to Classic Manor,
and the guys who helped finish it, Frankie Dalton, Earl Dalton, Mark Thomas,
WildMan (don't ask) and Joe Cox. Doug's wife, Marlene, helped with
carrying some stuff (she is the muscle of the outfit) and some cleaning.
Total cost hasn't been added up, but
is on the order of $22k. Then we put the tools in here. This place is
exceptionally tight. We can air condition it with a 7k BTU air conditioner,
and any woodstove is too much heat -- we heated the first winter
with kerosine, but eschew that at today's prices. Once its warm, it stays
warm for hours after the fire goes out, even in 20 degree temps and high
winds, unless we open windows.
When there is a fire in the stove, the windows are mostly open, so we
have the best of fresh air and warmth together. Great place to work!